Use-case tutorial: NFT store
In this tutorial, you demonstrate the interactions that are common in NFT (non-fungible token) stores.
Allow about 30 minutes to complete this tutorial.
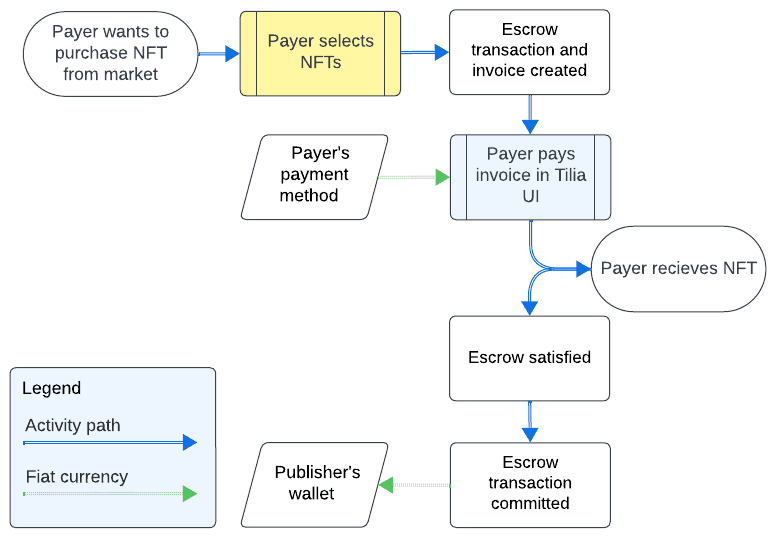
The following diagram shows how the escrow transactions that Tilia services provide works for an NFT sale.

In the case of an NFT, the purchase and delivery of the product happen in different venues. The NFT is purchased in your application's marketplace, for example, while the delivery, the transfer of ownership, takes place in a blockchain. Tilia services supports these sales by using escrow transactions.
In an escrow transaction used to purchase an NFT:
- The publisher creates an escrow invoice for the transaction.
- The buyer pays the invoice.
- Upon notice of payment, the NFT's ownership is transferred.
- After ownership is transferred, the payment is released to the publisher.
API operations in this tutorial
This tutorial uses the Tilia APIs in this table to demonstrate these common interactions to onboard a new user to an NFT marketplace.
| Tutorial interaction | API operations used |
|---|---|
| Add payer's user account | Register account |
| Add a payment method to payer (UI) | Add Payment Method widget |
| Get payer's payment methods | Get payment methods |
This tutorial then uses the Tilia APIs in this table to demonstrate these interactions to process the escrow transaction for an NFT.
| Tutorial interaction | API operations used |
|---|---|
| Create the escrow transaction | Authorize invoice |
| Pay escrow transaction | Pay an escrow transaction Note that in this tutorial, the invoice is paid in the Checkout UI. |
| Commit escrow transaction | Commit an escrow transaction |
To complete this tutorial
This tutorial uses the _Manage user accounts and Explore Tilia transactions collections from the shared workspace.
To complete this tutorial successfully:
- Make sure the software described in Get started with the tutorials has been installed on your system and configured.
-
In Postman:
- Open the Tilia tutorial workspace you created in Get started with the tutorials for this tutorial.
- Make sure you have the _Manage user accounts and Explore Tilia transactions collections forked to your Tilia tutorial workspace .
-
Make sure that you've selected the
Tilia Client Info
environment and confirmed that it has:
- Your Tilia developer credentials.
- All of the user-related environment variables with Current values defined.
- In your Tilia tutorial workspace , open the list of Collections .
- If it's been more than an hour since you last got an access token for this collection, get a new one as described in Tutorial: Transactions overview , and then return to continue here.
Add new users to the marketplace
The User account tutorials demonstrate adding new users. If you've recently completed the User account tutorials, you can review those exercises to make sure the user accounts are ready to make transactions. If not, complete those tutorials before continuing.
When the user accounts of your store are ready, continue to the next section.
Buy an NFT
In this exercise, you create an escrow transaction on behalf of the payer who wants to buy a single NFT using the credit card they added in the previous exercise.
The purchase process includes these interactions:
| Tutorial interaction | API operations used |
|---|---|
| Create the escrow transaction | Authorize invoice |
| Pay escrow transaction | Pay an escrow transaction |
| Transfer of NFT ownership | Processed by the marketplace application |
| Commit escrow transaction | Commit an escrow transaction |
In another window, open the Make NFT purchase transactions tutorial to process an NFT purchase, and then return to continue in this topic.
View the transaction details
After completing the previous transaction, you can look at the transaction details to see the record of the transaction.
In another window, open Get transaction details (API) and follow the To use the Tilia API to get the details of the most recent escrow transaction procedure.
When you look at the transaction details of an escrow invoice, notice that the escrow invoice contains three separate invoices, one for each stage of the transaction. To see the details of those invoices, follow the To use the Tilia API to get the details of the most recent standard transaction procedure, and replace the default invoice ID with an invoice ID value from the escrow invoice.
Conclusion
The exercises in this tutorial walked you through interactions that are common in an NFT marketplace. You can build your NFT marketplace on these Tilia services to get started.
You might also enhance your NFT store's experience by adding these features:
