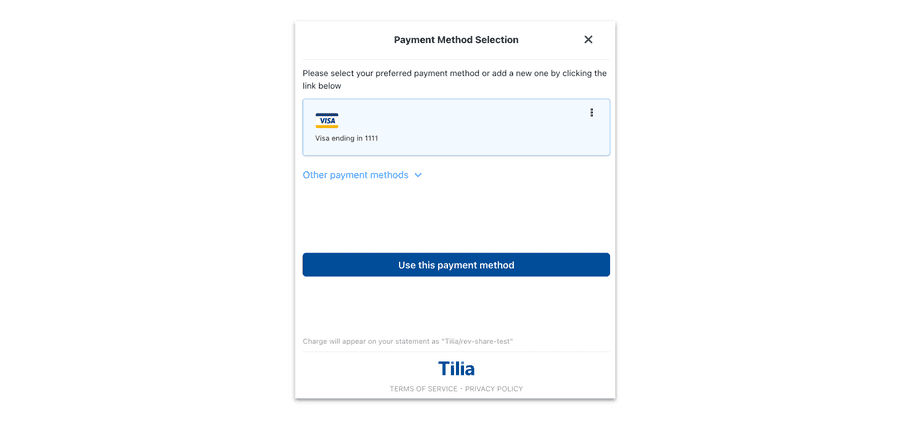
Payment Selection Flow
The payment selection flow enables users to accomplish the following tasks:
- Select a Payment Method in the context of a payment
- Add, remove, or give a nickname to their payment method
- Set a default payment option
- Optionally use their remaining wallet balance before using an additional payment method

This flow begins with a check for a signed TOS. If one has not been signed, a TOS screen appears for a user to accept before proceeding with the flow.
Requirements
| Requirement | Description |
|---|---|
ID of the <div /> element |
Your named <div /> in which the payment selection flow will be rendered |
| Redirect URL | URL that initiates the flow |
Supported flowConfig Options
Provide transaction_amount into flowConfig.transactionDetails to allow users the ability to choose their remaining wallet balance before a second payment method.
| Keys (all optional) | Values | Description |
|---|---|---|
| hideExitButtons | boolean (default: false) | Hides 'X' button where user can close out the UI. |
| hideUserWallets | boolean (defaults to false) | Hides wallet funds in the UI. |
| transactionDetails.transaction_amount | string or int representing the amount to the penny (i.e. '1000' for $10) | Allows the UI to ensure proper selection for the amount provided. |
| transactionDetails.currency | currency code (string) | Allows defining currency code for the amount provided. |
| selectButton.label | string | Allows customizing the message on the 'Use this Payment Method' button. Any passed in value should respect the user's localization preferences. |
| postOAuthURLOverride | url (string) | Only relevant to native applications where a user needs to be redirected to a browser for OAuth validation (i.e. Paypal). To allow the native application to be opened after validation (through a universal link, or custom url scheme) you can supply the url string here. For this to work though, we have to add the url domain pattern to an allowed list of redirect patterns (please see your account rep to set this up). |
Output
Upon completion, this flow returns an array which can be passed directly into the call to make a payment. This array includes the following values:
-
The
payment_method_id(s) the user wants to use for the transaction. -
The
amountthe user wishes to place on each payment method. A value of “0” indicates the remaining value of the transaction will be charged to that payment method. One of the payment methods must have a value of "0".
attention
This flow does not, by itself, execute a payment. It simply provides a UI for the user to select (or add) payment methods for use in a payment. Refer to our Developer Guides for information on processing transactions.
Restricting Payment Method Types
Payment methods have a maximum value for which they can be used. By default, credit cards can only be used for payments up to $10,000. In the case that a user tries to execute a payment for a larger value than the allowable amount, the payment will fail.
If the value of transaction_amount in the flowConfig exceeds the allowable amount for a payment method type, the widget will filter out any saved payments of that type as well as disable the buttons to add additional payment methods of that type (like the “Add Card” button).
Widget Flow
Use the following steps to open and customize the payment selection flow in the widget:
-
Copy the following code sample
window.Tilia.execute({ rootId: "< YOUR-ELEMENT-ID >", flow: "payment-selection", flowConfig: { // Optionally include transactionDetails to allow the user the key functionality // of choosing their remaining wallet balance before a second payment method. // for more information, see supported flowConfig options above. transactionDetails: { transaction_amount: "< TRANSACTION-AMOUNT >", currency: "USD" } }, redirect: "< WIDGET-REDIRECT-URL >", onComplete: handleComplete, onError: handleError, }); - Replace the placeholder values (< YOUR-ELEMENT-ID >, < WIDGET-REDIRECT-URL >, and < TRANSACTION-AMOUNT >) with the values from the Requirements and Config Options sections
- (Optional) In the theme object, customize the appearance of the widget
Events
The payment selection flow fires the following events.
OnComplete
The handleComplete callback will be invoked by the widget with the result of the flow.
If the user cancels anywhere in the flow:
{
    "source": “tilia",
    "event": “tilia.payment-selection.complete",
    "state": “cancel",
}
If the user completes the flow:
{
    "source": "tilia",
    "event": "tilia.payment-selection.complete",
    "state": "complete"
    "paymentMethods": [
        {
            "payment_method_id": "a787923c-4b82-4400-81e4-34f7baa849b3",
            "amount": 5000
        },
        {
            "payment_method_id": "5ee85a7a-8319-4a53-837c-5d909d184442",
            "amount": 0
        }
    ]
}
The value returned in the paymentMethods array can now be passed directly into the call to make a payment. Refer to the Create Invoice API Reference for more information.
